Saturday, April 30, 2011

Apple Sauce

100% pure farm fresh apples


Just wash your apples, put them in a pot with a 1/2 cup of water. . enough to cover the bottom of the pot 1/4 inch. Bring the apples to a simmer and simmer about 10 - 15 minutes or until soft and tender.
You don't need to peel the apples, nor core them nor remove the stems. . .
Just cook them.
Then, put the food mill over a large bowl and pour your apples into it and stir,
. . . once in a while you'll need to stir counter clockwise to scrape the peels off the bottom.
There is nearly no waste. . . .and leaving the cores and seeds in for cooking provides natural pectin to make a nice thick applesauce.
Once done. . .taste and add sugar to your liking.
You can put it into containers and freeze.

Friday, April 29, 2011

Glazed Fruit


Ingredients and Method
-8 cups assorted fresh fruit, cut into bite sized pieces (drained canned pineapple works well)
-1 19oz (2 cups) can peach pie filling.

In a large bowl cut up fruit and fold in the pie filling. Transfer well coated fruit into your serving bowl and enjoy.

Tuesday, April 26, 2011

Cedar Planked Crab Stuffed Sockeye Salmon

Fresh British Columbia Wild Sockeye Salmon is a perfect BBQ treat for special friends.

You will need to buy some untreated cedar planks that can be found most places that have BBQ supplies. We soaked the planks for 5 hours in water. They float so you will need to weigh them down. Just before you are ready to BBQ the salmon, you will preheat your grill to 425.

Put your planks down on the grill, leave 2 minutes and turn over. . leave 2 minutes and flip them onto the other side. Just before putting the salmon on the planks. . drizzle a bit of olive oil on each plank and a sprinkle of salt. . . and place your salmon on the board. I found individual portion sized planks which I placed on each plate and then allowed each person to remove the salmon and I collected the boards before the dinner started.
Crab Stuffing
  • 2 cups of crab meat. . I bought a can of crab in the deli section at Costco made up filling from the whole can and froze half for next time.
  • 1/4 cup butter
  • 1/2 cup diced onion
  • 1/2 cup finely diced bell pepper .. any color works. . I used yellow
  • 2 beaten farm fresh eggs
  • 2 teaspoons Dijon mustard
  • 1 teaspoon lemon dilly dip mix. . I used epicure. .but you could use fresh dill and some lemon juice and it would be great. .
  • some salt and pepper to taste
  • 3/4 cup panko bread crumbs. . any crumbs would do but the Japanese crumbs is what I had on hand
  1. Saute the onion and pepper until translucent. Add the seasoning and the mustard and the crab. I would taste it at this point to make sure it does need salt. . add a grind of fresh pepper.
  2. Add the beaten eggs and the bread crumbs.
  3. Cover and refrigerate until you are ready to stuff your salmon.
I bought 2 sockeye salmon fillets. I carefully removed the skin with a sharp knife. It is a bit tedious but only took a few minutes. I then cut 1 1/2 inch long strips down the length of the salmon. Depending on the weight of your salmon you will get either 3 or 4 strips per fillet.
After they are sliced, roll each strip of salmon into a circle. . a little hole will remain in the center for you to plop your crab filling. I used an ice cream scoop to put the crab filling into each circle of salmon. I covered it with plastic wrap and refrigerated it the rest of the afternoon.
When the cedar planks were ready, I took a large egg flipper and slid each salmon/crab circle onto the plank. If your grill tends to flare have a spray bottle ready with water to douse the flames.
As I said at the top in the preparation for the cedar planking. . the grill should be 425 F. Set your timer for 14 minutes. . Have your plates ready and enjoy.
I made an easy cucumber sauce to go with the salmon
Cucumber Sauce
  • 1 cup sour cream
  • 1 cup finely diced cucumber
  • a squeeze of lemon juice
  • some fresh chopped dill
  • some fresh chives
  • a fresh grind of salt and pepper to taste
refrigerate this until the salmon is served. .

Monday, April 25, 2011

Glutten Free Cherry Squares

 
  • 2/3 cup warm milk
  • 1 tsp sugar
  • 1 tbsp yeast
  • 1 cup pancake flour mix
  • 1 cup sweet rice flour
  • 1 cup butter
  • 4 egg yolks
  • 1 tin cherry pie filling
  • 2 tbsp instant tapioca
  • sweet rice for rolling
  • toasted almonds
  • white icing

  1. Whisk sugar and yeast into the warm milk and let proof
  2. Cut 1 cup butter in to the blended flours
  3. Add the 4 yolks to the proofed yeast and beat together until well blended
  4. Pour liquids into the flour mixture and mix into a ball
  5. Turn dough out onto surface sprinkled with sweet rice flour, and knead lightly adding ONLY enough flour to allow it to be handled.
  6. Divide dough in half, rolling out one piece between sweet rice sprinkled plastic wrap layers. Roll it out quite thin , to fit a 9 x12 inch pan.
  7. Remove top plastic wrap and picking up dough with lower plastic wrap turn into pan... pushing up the edges of dough .. remove plastic wrap
  8. Stir the 2 tbsp of tapioca into the cherry filling and spread evenly over bottom pastry layer
  9. Roll out the top layer and place over the filling making sure to crimp the edges
  10. Prick the top with a fork to allow steam to escape
  11. Bake for 45 minutes at 350 degree oven
  12. Remove when golden and cool... while still warm cover with white icing and sprinkle with toasted almond flakes.

Friday, April 22, 2011

Paska

1 cup milk (1/2 cup cream and 1/2 cup milk)
  • 1/2 cup melted butter
  • 1 cup water
  • 3 Tbsp. yeast
  • 1/4 tsp. salt
  • 8 - 10 whole eggs
  • 1 1/2 cups sugar
  • 2 Tbsp. lemon zest
  • 10 cups flour.
Kneading Machine Procedure
  1. Heat milk just to a scalding level, then add butter which will melt in the milk.
  2. Add 1 cup water to the milk mixture and by now this will have cooled down the hot milk.
  3. In mixing bowl blend half of the flour with fast rising yeast, and add salt.
  4. Add liquids and blend for 5 minutes on lowest setting.
  5. Combine sugar and eggs and lemon zest into a mixing bowl and beat for several minutes.
  6. Add remaining flour and add egg mixture into the kneading bowl, and knead at a high setting till the dough pulls away from the mixing bowl.
  7. Dough texture should remain soft.
  8. Let the dough rise in the mixing bowl till doubled in size. Cover with saran wrap and towel.
  9. Meanwhile prepare your baking pans with cooking oil or parchment paper.
  10. Shape your dough into preferred pans and let rise again for 1 hour or till doubled in size.
  11. Bake at 325 degrees. Buns need 20 minutes, while loaves need about 35-40 minutes.
  12. Ice with your favorite spread.

Here's my favorite Icing ~ And I love this one because you can make it ahead of time and keep it in the fridge up to three months. It's also excellent for cinnamon buns.
  • 2 tablespoons cold water
  • 41/2 tablespoons white sugar
  • 2/3 cups shortening
  • 1 egg
  • 21/2 cup icing sugar
  • 1 teaspoon vanilla
Dissolve white sugar in water. Shake or stir frequently. Set aside. Beat remaining ingredients to the consistency of whipped cream. Beat in sugar and water mixture. Store covered in refrigerator. Will keep up to 3 months.
Most of our family will slice the Paska and spread it on like butter. So take the extra spread along with you. And you must always add many colorful sprinkles.

Meanwhile, let's not loose the real message of Easter in Paska making, but rather focus on who Jesus is; the Crucifixion and the Resurrection.

Thursday, April 21, 2011

Deviled Eggs


Ingredients:
  • 6 large eggs, hard boiled
  • 1/3 cup mayonnaise
  • 1/4 tsp prepared mustard
  • 1/4 tsp salt
  • 1/4 tsp white or black pepper
  • 1 tbsp finely chopped chives or green onions
Method:
  1. Hard boil eggs and peel.
  2. When completely cooled, cut each egg in half.
  3. Scoop yolk of eggs into a small bowl. Add remaining ingredients and mash together well with a fork.
  4. Fill a pastry bag with filling and pipe into hollowed out egg white shells. Or, using a small spoon place little mounds into each shell. 
  5. To add a nice touch, sprinkle with paprika, very finely chopped parsley, or more finely chopped chives or green onions. Refrigerate until ready to serve. Best served the day it is made. If you want to make them the day ahead, get everything ready, seal shells and yolk mixture in separate containers and fill the next day. 

Tuesday, April 19, 2011

Victory Muffins!

So I have been posting less.   We are a YMCA family.  We are at the Y everyday working out, playing, hitting the waterpark.  Its just what we love to do.  I use to play comptetive sports so when I am at the gym that all come back to me.  I use to train around 8 hours a day and looked like I live for sports.  But I am one of the ladies who breaks down after having childern.  ive had multiple surgeries and health problems related to my choice to have babie, which by the way I happily accept all of the problems to have my kiddos.  Long story short I got a JOB.  The YMCA offered me a group trainer position and cardio fit cross training.  I work 3-4 nights a week from 4:30-7.  Its a much better fit for my famiy compares to the PD.  I work 10 hours a week instead of 36 and the nights my husband isn't home yet from work to watch the kids I get to take them to work so they can go to the learning center!  Its a win win.  PTL

So onto the muffins!

I've made these quite often this summer. They are a lovely, firm textured muffin.
You can substitute a 1/4 cup ground flax, wheat germ or bran for 1/4 cup of the flour to make them more nutrituous if you like.
One more thing to note - I distribute the blueberries between the muffin cups rather than folding them into the batter
  • 1 1/4 cups flour (can use part whole wheat flour if desired)
  • 1 cup oatmeal
  • 2/3 cups granulated sugar
  • 1 1/2 tsp. baking powder
  • 1 tsp. baking soda
  • 1/2 tsp. salt
  • 1 egg
  • 1 cup mashed ripe bananas
  • 1/2 cup buttermilk
  • 1/3 cup butter or margarine, melted
  • 1/2 cup chopped pecans
  • 1 cup fresh or unthawed frozen blueberries
  • Pecan topping if desired ( Mix together: 1/4 cup oatmeal, 1/3 cup brown sugar, 1/4 cup chopped pecans)
  1. Combine dry ingredients in mixing bowl.
  2. Mix well.
  3. Beat together banana, buttermilk, egg and melted butter until smooth.
  4. Add to dry ingredients and stir just until blended.
  5. Stir in chopped pecans.
  6. In oiled muffin tins, fill cups 1/2 full. This makes 1 doz. medium sized muffins so you will have some batter left over for the next step.
  7. Top with 3 blueberries and then fill cups with remaining batter.
  8. Top each cup with 3 more blueberries
  9. Sprinkle with pecan topping if desired.
  10. Bake at 375º F for about 20 to 25 minutes. (A toothpick inserted into a muffin will come out clean)
  11. Remove from cups and cool on rack.

Saturday, April 16, 2011

Banana Hazelnut split cake


Banana Hazelnut Split Cake

  • 1 cup margarine or butter
  • 1 1/2 cups sugar
  • 3 eggs
  • 1 tsp. vanilla
  • 3-4 mashed bananas
  • 1 cup buttermilk
  • 1/4 tsp. salt
  • 3 cups flour
  • 2 tsp. baking soda
  • 2 tsp. baking powder
  • 2 cups whipping cream 
  • 1 teaspoon vanilla
  • 3 tablespoons sugar
  • Nutella (chocolate hazelnut spread)
  • 1 pint fresh strawberries
  1. Mix butter and sugar.
  2. Beat in eggs...and vanilla, bananas and buttermilk.
  3. Combine flour, salt, baking soda and baking powder.  
  4. Add to banana mixture; stir until blended.
  5. Pour into two well greased nine inch round cake pans.
  6. Bake at 350 degrees for about 40 minutes...or until set in centre. 
  7. Allow cakes to cool completely.

To assemble:

  1. Whip cream, vanilla and sugar until stiff.  
  2. Split each cake layer in half horizontally. 
  3. Spread the bottom half of each cake with a generous layer of Nutella, and reassemble to form two cakes.
  4. Create a flat top on one of the cakes by shaving off the rounded top.
  5. Set this layer on a cake plate...and spread with whipped cream, sliced strawberries and more whipped cream.
  6. Gently set remaining cake layer on top.  
  7. Frost with whipped cream.  Garnish with strawberries.

Tuesday, April 12, 2011

Slow Cooker Chicken Salsa

Ingredients
    4 boneless, skinless chicken breasts 1 cup salsa 1 package reduced sodium taco seasoning 1 can reduced fat cream of mushroom soup (condensed) 1/2 cup reduced fat sour cream


Directions

Add chicken to slow cooker.
Sprinkle taco seasoning over chicken.
Pour salsa and soup over chicken.
Cook low for 6 to 8 hours.
Remove from heat and stir in sour cream.
Serve with rice.

Monday, April 11, 2011

Golubtsi

1 head of cabbage
2 lbs. of hamburger
1-1/2 Cups cooked rice cooled
1/2 onion grated
1-1/2 teaspoons salt
1/4 teaspoon pepper
1 Tablespoon chopped parsley
1 can condensed tomato soup
1- 8 oz. can tomato sauce
2 Tablespoons ketchup
1 onion chopped
1-1/2 Cups sour cream
2 Cups water
Core the cabbage leaving it whole. Boil in a pot of water until leaves separate easily. Drain leaves and let them cool while you prepare the filling. Once the leaves are cool enough to handle you can trim some of the thick vein of the cabbage leaf to make it easier to fold.
Combine the hamburger, rice, onion, salt, pepper, and parsley. Place about 1/3 cup of this mixture onto a cabbage leaf and fold edges over and roll up. Place in baking dish. Continue until you use up the hamburger mixture and cabbage leaves.
Saute the chopped onion in a little oil until it is translucent. Add soup, tomato sauce, ketchup, and water. Mix well. Bring to a boil. Add a little of this sauce to the sour cream to temper it and then add the sour cream mixture to the sauce. Pour the sauce over the cabbage rolls. Bake in a 350 degree oven for an hour or longer.
Our nieghbor (who was assisting while cooking) doesn’t tolerate milk products the greatest so I made a small batch of the Golubtsi and covered them with the sauce before I added the sour cream to the rest of the sauce. We find that using hamburger that is 15% fat or more is better for these as the meat that has less fat in it can be dry.
Serve with your favorite green side dish and some good bread to soak up the sauce with!

Tortilla Egg Cups


  • 4 small tortilla shells (I used whole wheat but you can use any flavour of your choice)
  • 8 eggs
  • 1 teaspoon (or less if you don't like it spicy) ground chili paste (sambal oelek) found in the Asian food section
  • 1/2 teaspoon chili powder
  • 1/2 teaspoon dry mustard
  • 3/4 cup cottage cheese
  • 3 tablespoons chopped sweet red pepper
  • 3 tablespoons chopped chives
  • 2 slices deli ham finely diced or ready cooked bacon
  • grated cheddar for sprinkling on top
  • salt and pepper to taste
  1. Preheat oven to 375 F
  2. Spray 4 ramekins with cooking spray and ease the tortilla shells inside each cup trimming the excess shell and pressing to fit. Put the ramekins on a baking sheet.
  3. Beat together the eggs, chili paste, dry mustard, chili powder, cottage cheese.
  4. Add the veggies and bacon.
  5. Divide evenly between the cups.
  6. Grind some fresh salt and pepper over top.
  7. Sprinkle with cheese.
  8. Bake for about 30 minutes or until eggs are set.
  9. Remove from ramekins before serving.

Saturday, April 9, 2011

Asparagus wrapped in Prosciutto

This is very simple and tastes really good.

Prepare your asparagus by washing it and trimming it down to the best part of the stalk. Dry it and then wrap a thin piece of prosciutto around each stalk. I use bamboo skewers to make it easier to flip them once under the broiler. Stick them under the the broiler flame and watch them carefully. It won't take long for them to be ready to eat. I'm sorry I don't have a specific time to keep them under the flame. Just watch them and when the prosciutto gets a little crispy on the edge flip them and watch them again. Plate them and watch them disappear.

Thursday, April 7, 2011

Baby Food...

I have 9 month old twins.  So as I have been making baby food these past few weeks I have been putting together recipes and photos to share with you.  My method of storing baby food is simple, I bought ice cube trays with lids at walmart.  I fill seal and store.  Each cube is 1 serving and only takes about 20 seconds in the microwave to come back to life.

Persimmon Puree

persimmon-puree.jpg
Persimmon Puree (Makes 4 Serving)
2 Persimmons
1. Peel the skin off the persimmons and cut into cubes.
2. Place the cut persimmon into a food processor and puree until smooth.
3. Serve.

Roast Pear & Banana Puree

roast-pear-banana-puree.jpg
Roast Pear & Banana Puree (Makes 6 Servings)
2 Bananas, cut into 1 inch pieces
2 Pears, peeled and cut into wedges (I used Bartlett pears)
1. Preheat oven to 400 degrees.
2. Place the bananas and pears on a parchment paper or Silpat lined baking sheet.
3. Roast for 25 minutes.
4. Puree until smooth.
5. Cool and serve.

Apple Fennel Puree

apple-fennel-puree.jpg
Apple Fennel Puree (Make 6 Baby Servings)
1 Fennel Bulb, fronds removed and fennel bulb (the white part) chopped
2 Apples, peeled, cored and chopped (I like to use Gala, Pink Lady or Fuji apples)
1. Place the fennel in a steamer pot over boiling water and cook for 4 minutes.
2. Add the apples to the pot and cook for an additional 3-4 minutes or until fennel and apples are fork tender.
3. Place the mixture in a food processor and puree.
4. Serve.

Brown Rice Cereal


Brown Rice Cereal (4-6 servings)
1/2 Cup Short Grain Brown Rice (I like to use organic brown rice)
1. Place the brown rice in a spice grinder or blender for 45 seconds-1 minute or until finely ground.
* At this point you can store the rice powder in a sealed container in the refrigerator or in a cool dark place.
To make 1 serving for a 4-6 month old baby, bring 1/2 cup of water to a boil and sprinkle in 2 tbsp of the ground brown rice. Whisk continuously for 30 seconds and then occasionally for 4-5 minutes or until the mixture is thick and creamy to prevent any lumps from forming

Wednesday, April 6, 2011

Zucchini Mousaka

Yesterdays Storm was a call for major comfort food.  Also my husband was home so I had someone to take lots of photos while I cooked. 
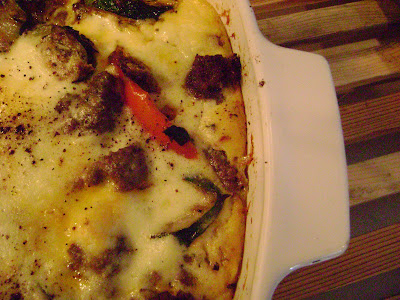
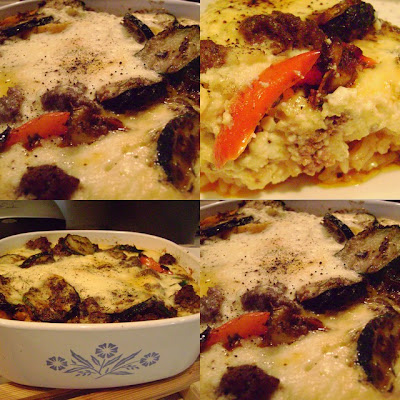
There are four layers in my version of Mousaka. Meat, Rice, Cream cheese sauce and the Zucchini and vegetables.

Rice: Melt 2 tbsp butter in saucepan. Saute 1 minced clove garlic; when softened add 1 cup BASAMATI (nothing else really will do) and stir till well coated with the butter and garlic. Turn up heat and add two cups chicken broth. (1 can plus 1 can water will do). Bring to a boil and then cover and turn to simmer for ten to 15 minutes; fluffing when the liquid is absorbed. Remove from heat.

Meat:
Slowly brown 1 lb lean ground beef over low heat. While still pink add 1/4 tsp nutmeg, 1 minced clove garlic and 1/2 finely chopped white onion. Continue to brown, draining when done.


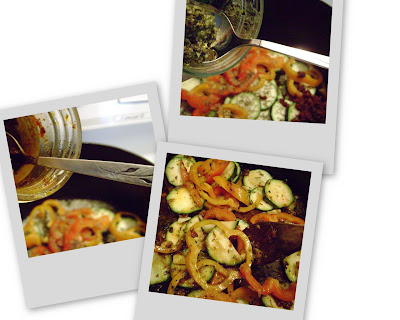
Zucchini and Vegetables: In a separate skillet heat 2 tbsp olive oil. Saute 1 clove minced garlic and 1 sliced zucchini. Add 1 tbsp fresh basil pesto sauce and 1 tbsp sundried olives in oil. Add salt and fresh pepper to taste. Add 1 red and 1 yellow pepper sliced in rings. Continue to saute until vegetables are slightly softened. Put aside.

Cream Cheese Sauce: In a bowl whisk 3 eggs, 1/4 cup flour and 1 cup of whipping cream at room temp. Pour mixture into a saucepan in which 2 tbsp of butter has been melted. Bring to a light boil ...turn down heat. Add about 4 tbsp goat cheese. Keep on a very low heat until used in the layers.

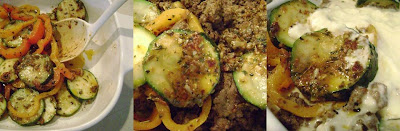
In a casserole dish layer the rice, 1/2 the vegetables, and then meat, remaining vegetables and then top with the cream sauce. Sprinkle nutmeg on top and pop in 350 oven for 35 minutes.
y

Tuesday, April 5, 2011

Mediterranean Quiche

  • 1 medium yellow onion, diced
  • 1 red bell pepper,diced
  • 1 yellow or green pepper, diced
  • 1/2 teaspoon oregano
  • 1/2 cup sliced olives
  • 1 tablespoon olive oil
  • 1 small tomato diced
  • 1/4 cup finely chopped sund dried tomato
  • 1/2 cup crumbled feta cheese
  • 4 large eggs
  • 1/2 cup bisquick
  • 1 teaspoon salt
  • 1/4 teaspoon ground pepper
  • 1 1/2 cup milk
  • Spray a deep dish pie plate with cooking spray and set aside.
  • Preheat oven to 350 F
  1. In a medium sized skillet,  heat the oil and then saute the onion, peppers and oregano until the veggies are  translucent.
  2. Spread them evenly in the pie plate.
  3. Arrange the sundried tomato, the diced fresh tomato, olives  and the feta cheese over top.
  4. Combine the rest of the ingredients in a blender or a mixing bowl and beat until smooth.
  5. Pour over the ingredients in the pie plate.
  6. Bake at 350 F for one hour. (stick a sharp knife into the center to make sure it comes out clean)

Monday, April 4, 2011

In honor of my husband, tattoo cupcakes


tattoo cupcakes

  • 3/4 c canola oil
  • 3 eggs
  • 3/4 c milk
  • 2 tsp pure vanilla extract
  • 2 cups all-purpose flour
  • 2 tsp baking powder
  • 1/4 tsp salt
To decorate
  • Red. white and blue fondant
  • White chocolate ganache* see recipe below
  • Anchor cookie cutter, heart cookie cutter, edible pens, small brush, glass of hot water, angled spatula, sharp paring or small knife and some cornflour/cornstarch and a small rolling pin to roll the fondant.

The scrolled ribbon and anchor
1. Preheat oven to 350F and line a cupcake baking pan with paper liners. Use a handheld electric mixer to beat sugar and oil together in a large bowl, then cream in eggs until light and fluffy; beat in milk and vanilla. In a separate bowl, mix together flour, baking powder, and salt. Gradually beat dry ingredients into wet until just combined, making sure not to over-mix.

2. Fill each cupcake well with batter to just under the top of the paper liner (I usually only fill cupcake liners 3/4 full, but for this recipe I like to fill the wells a little more than usual to make sure that I get a nice upper rim that I can cut off). Bake 22-24 minutes, or until light golden around the edges and a toothpick inserted into the cupcake comes out clean or with just slightly moist with a crumb or two. Cool for 5-10 minutes in the cupcake baking pan and then remove to a wire rack to finish cooling completely.

3. Make the white chocolate ganache. To create a smooth topping for a dozen cupcakes melt 300grams of white chocolate with 1/2 cup of cream until a smooth consistency. Allow to set firmer-you can do this in the fridge. Then uding a small angled metal spatula smooth the spreadable ganache over the cupcake coating it. Then filling a glass with hot water, dip the spatula in the water, shake off any excess water lightly and then smooth over the ganache surface to give it a smooth surface. The heat from the hot water and tiny drops of water make it smooth. Allow to set.

4.  Dust a clean surface with a light dusting of cornflour and using a rolling pin roll out the white fondant first. Cut out some circles to fit the top of the cupcake (I used a fluted cutter but a plain is fine), white anchors using the anchor cutter (sadly this is difficult to freeform cut unless you are very dextrous) and cut out some “ribbon” for the mum tattoo and fold it over at each end so that it looks like a ribbon scrolled. Cut out some small squares for dice. Roll out some thin “sausages” of white fondant which you will intertwine with red fondant to create the anchor ropes.

Anchor ropes
5. Roll out the red fondant (wiping the surface clean with a dry cloth between colours and redusting with fresh cornflour) and cut out some rounds to fit the top of the cupcakes, some red hearts and some lips (I shaped these in the same way I did the vampire cookie pops). Roll out a thin red fondant sausage and intertwine it with the white fondant to make the anchor. Roll out the blue fondant (again wiping the surface clean with a dry cloth and redusting with cornflour) and then cut out some discs to cover the top of the cupcakes.

6. With the brush, brush the ganache top of the cupcakes lightly with water. Affix the fondant discs onto the ganache. Place the hearts on top of some of the cupcakes and place the scroll on top affixing each with a small amount of water. Draw Mum on the ribbon with an edible ink pen or an icing pen. Draw dots on the dice and affix these to some cupcakes. Then do the same for the anchor and the rope and the lips where you can draw whatever message you like.

Prawn, lemon and garlic ravioli

Serves 4 as an entree or makes 8 ravioli
  • 300g raw prawns with heads on
  • 1 tablespoon cream
  • 6 basil leaves
  • 16 round gow gee wrappers
  • 1 clove garlic, chopped finely
  • 1/3 cup of olive oil
  • 1/2 lemon, zested using a vistrus zester
  • 2 tablespoons lemon juice
1. Remove the heads and shells from all but 4 of the prawns. Set the best 4 prawns aside. In a food processor, blend the shelled prawn meat, cream and 3 basil leaves until it becomes a paste.

2. Bring a large pan of salted water to the boil. While it is boiling, assemble the ravioli. Take 1 teaspoon of the prawn mix and using water, seal the edges by pressing them well together. Ensure that they are sealed very well and try and flatten the prawn meat in the centre so that they are easier to balance on top of each other. Drop 2 at a time into the boiling water and cooked until the meat becomes pink- about 4-5 minutes. Drain and set aside onto the serving plates. Lastly cook prawns until pink throughout and drain and reserve.

3. As they are cooking, make the sauce which is very easy. Just place the olive oil, zest from 1/2 of the lemon, 2 tablespoons of lemon juice and garlic in a bowl and mix to emulsify. Shred remaining 3 basil leaves with your hands and add this too.
4. Assemble ravioli: place two on top of each other and then spoon 2 tablespoons of dressing over them. Then place one prawn on top of the stack and serve.

Sunday, April 3, 2011

40 Clove Garlic Chicken

****WARNING**** bug season is in full effect so we will be cooking with ALOT more garlic, the more garlic in you the less you are bit.


Ingredients

  • 40 garlic cloves (3 to 4 heads), unpeeled
  • 1 whole chicken (3 1/2 to 4 pounds), rinsed and patted dry (giblets removed)
  • 2 tablespoons butter, room temperature
  • Coarse salt and ground pepper
  • 6 sprigs fresh thyme

Directions

  1. Preheat oven to 475 degrees. Place garlic in a medium bowl; cover with another same-size bowl, creating a dome. Hold bowls together tightly, and shake vigorously until skins are loosened, about 30 seconds. Remove and discard skins; set garlic aside.
  2. Place chicken in a large ovenproof skillet or roasting pan. Rub all over with 1 tablespoon butter; season with salt and pepper. Add thyme, garlic, and remaining tablespoon butter to skillet.
  3. Roast, basting occasionally with juices and stirring garlic, until an instant-read thermometer inserted in thickest part of a thigh (avoiding bone) registers 165 degrees, 45 to 60 minutes. Transfer to a platter, and let rest 10 minutes. Carve chicken, and serve with garlic and pan juices.

Saturday, April 2, 2011

Mini Pizza bagels

What You Need

6 mini bagels, split, toasted
1/4 cup  pizza sauce
3/4 cup Shredded Mozzarella Cheese

Make It

HEAT broiler.
SPREAD cut sides of bagels with sauce; top with cheese.
BROIL, 6 inches from heat, 2 to 3 min. or until cheese is melted.
 

Friday, April 1, 2011

Torando Warnings...and kids crafts

We've had extreme weather the past few days, with our fair share of power outages.  Since our appliances are electric not alot of cookings has been going on here...

But to keep my 4 year old entertained we made home made ice cream in a bag...   its a kid craft/treat


Ingredients
  • 2 tablespoons sugar
  • 1 cup half and half
  • 1/2 teaspoon vanilla extract
  • 1/2 cup salt (The bigger the granules, the better. Kosher or rock salt works best, but table salt is fine.)
  • Ice cubes (enough to fill each gallon-size bag about half full)
  • 1 pint-size ziplock bag
  • 1 gallon-size ziplock bag
Instructions
  1. Combine the sugar, half and half, and vanilla extract in the pint-size bag and seal it tightly.
  2. Place the salt and ice in the gallon-size bag, then place the sealed smaller bag inside as well. Seal the larger bag. Now shake the bags until the mixture hardens (about 5 minutes). Feel the small bag to determine when it's done.
  3. Take the smaller bag out of the larger one, add mix-ins, and eat the ice cream right out of the bag. Easy cleanup too! Serves 1.